Crazy Colouring
When we are just hanging out colouring -because that is one of the best parts of teaching day care- I like to do abstract stuff and this is a fun goto activity. This could also be adapted as a parent’s day activity.
Trace a hand with a pencil.

Then trace two more on top over top the first at different angles.

Start colouring. I like to do all of one colour and not let the sections of each colour touch.

After you are done colouring, trace the hands with a marker.


Voila! You could add a profound statement about togetherness or all hands on deck and pretty frame it bit I like it as a fridge display.
Colouring is fun! (I’m Canadian hence the coloring with the U)
Double Single Elastic Bracelet
Its fun to have a job where I can play with craft stuff! Well there is the other grown up duties and things that make it a job but I do get to do fun stuff a lot.
A coworker came up with this one. She didn’t notice how I was doing the spool bracelet so she did it this way. It turned out to be basically two single bracelets intertwined.

Yellow and blue on 2 pegs and green and orange. I made an example in black and white.

Put your first elastic on the spool pegs across from each other twisted in the middle. Put another on the other 2011 pegs twisted once again. Put another elastic over what you just did both ways but don’t cross them this time. Take the bottom elastic and put it over the top one.

Keep going until you have the length you want. When you are ready to finish, take the elastic from one peg and put it on the opposite peg. Do the same with the other two.

Take the bottom elastic and put it over the top on each peg.

Now you can attach it to your clip and you have your bracelet.

In the middle of this one I did a criss cross of colours on the peg just to see.


It’s a fun easy stitch that is easy to pick up and one that I think is Good Enough.
Elastic Loom Corking
It was a fun day of elastic bracelet making at day care. Recently I saw on Pinterest how to do Lil’ Looms using a cork and push pins. We did a bunch of those then one of my co-workers had the thought to try it with 4 pins to sort of copy my previous idea of using a spool knitter/corker. Then it was time to play with the idea!

I started by working it on the side of the cork then one of the kids tried on the top. Both work well, it’s all in what you are comfortable with.

Put one elastic over all 4 of the pins then twist it around the pin once.

Then put another one over the top of that and put the first elastic over the top of the pins into the middle. I found using a crochet hook helps but if you have nimble fingers you can do it that way. Pull your bracelet out the side. The middle looks weird but it all works out. You keep on going as long as you want.
The pins may shift in the cork because of the tension but the good thing is you can re-position on the cork.

When you have the length you want, take the elastic off one pin and fold it over to loop over the pin opposite it. Do the same with the other one so that you now have 2 loops of the same elastic on 2 pins.

Put the lower loop over the top of each pin into the middle.

Then you can put the 2 loops onto a clip. We’ve been using not officially licensed elastics and have S clips which I like so much more than C clips.

And what does a table look like on loom day at day care? Super fun!

Good Enough Crafting fun!
Origami Trees
One of my “back pocket” activities that I can walk into any classroom and do is several origami shapes (crane, boxes, balloon, strawberry) and this week, thanks to this blog post I’ve added fir trees.
I tried one at home over the weekend and it is super beyond easy (especially if you’ve got your origami basic shapes down) Today I tried with a full-sized square of newsprint from the roll. Super cute. (it was later decorated the nines.

Here is a smaller version that I coloured green before folding. (I didn’t want to use “good paper” for just fooling around)

Pretty

My coworker tried using construction paper. It is thicker and takes more scoring when folding but it is a nice look.

ADAPTATION: After folding, glue down onto another paper to make a 3D card. 
It was fun. Try it! And the folds don’t have to be exactly perfect! I had 7&8 year olds doing it. Not too hard once you’ve gotten past the first few origami steps.
Spool Loom
If you have been anywhere near a child recently, you have probably seen the elastic bracelets on their wrists made with great industry with a Rainbow Loom kit. I wanted to try it but I’m too cheap to buy a loom just for me. While I was doing some on my fingers (I had a thought that maybe it could be done on a spool!
In days gone by, girls would put nails into a wooden spool and make long tubes of yarn by going around and around using a needle to flip each loop over. I have 2 in my possession, a commercial one I bought a few years ago that looks like a bumble bee and one that my mom used as a child and that was probably my grandmother’s in the 1930s.
To do this, you will need
- spool knitter loom (you can find these in stores)
- Rainbow Loom elastics and C clips
- needle or crochet hook (if you don’t have one with your spool)
- piece of string long enough to fit though your spool

How I did it was put a C clip on an elastic and a loop of string on the other side. You need to do this to pull your elastics though the spool to keep tension on it. If not it will get all bunched up and not fit though the hole!

Thread your string though the hole in your spool and put the first elastic on all 4 nails. Twist it on each nail. (you can kinda see it there ^ )
I didn’t do this but a good idea would be to take your C clip attached to the string and put it on the 4 sides. I only did one on this try and it really stretched the elastic on one side as I pulled it.
Put 2 other elastics on.
Use your needle or hook to pull the bottom loop over the top 2 and into the middle on all 4 nails.

Put another elastic on and keep going and going and going the same way. Remember to pull the string as you go. It’ll keep it from bunching! It will bunch but you should be able to work though it. Its elastic, don’t be afraid to pull hard. It does get easier as your knitting gets out the bottom.

If you are going to go that long that is, I was making mine for my adult super big wrist so it was twice as long as my spool.
When you are at the length you want, take the bottom elastic off over the top without adding a third to the nails.

You’ll need a second C clip here. Unhook the elastics off the nail onto the C clip all around. Pull your bracelet out of the spool and take the elastics off one of the C clips and put all of the on one. (its one of those weird hard/easy things that is hard to explain, ask a kid if you need help.

Tada! Yes, I did change colour elastics to colour block. It was pretty easy and fun to do. I suppose it’s a double knit one on the real Rainbow Loom? I think I’ll try a single knit another time.
Hope you can figure this out. If I can do it, everyone can!
Electrical tape rose
I crafted! The other day was a no school day for the kids at day care so I brought some tape in for crafting. While they were making wallets with weird pattern matches I decided to take some electrical tape and try to make a tiny flower.

The quarter is there for a size comparison. And now, how to.
The one I did at work I just worked on a small roll of tape but decided to do today’s on a stick but couldn’t find the skewers at the dollar store so bought some pipe cleaners.
Electrical tape comes in basically 6 colours. Black, white, blue, yellow, red and green. You can use whatever brand you find. This is from a hardware store but dollar stores carry it too.

You need:
- electrical tape
- scissors
- knife
- pipe cleaners
- self healing mat
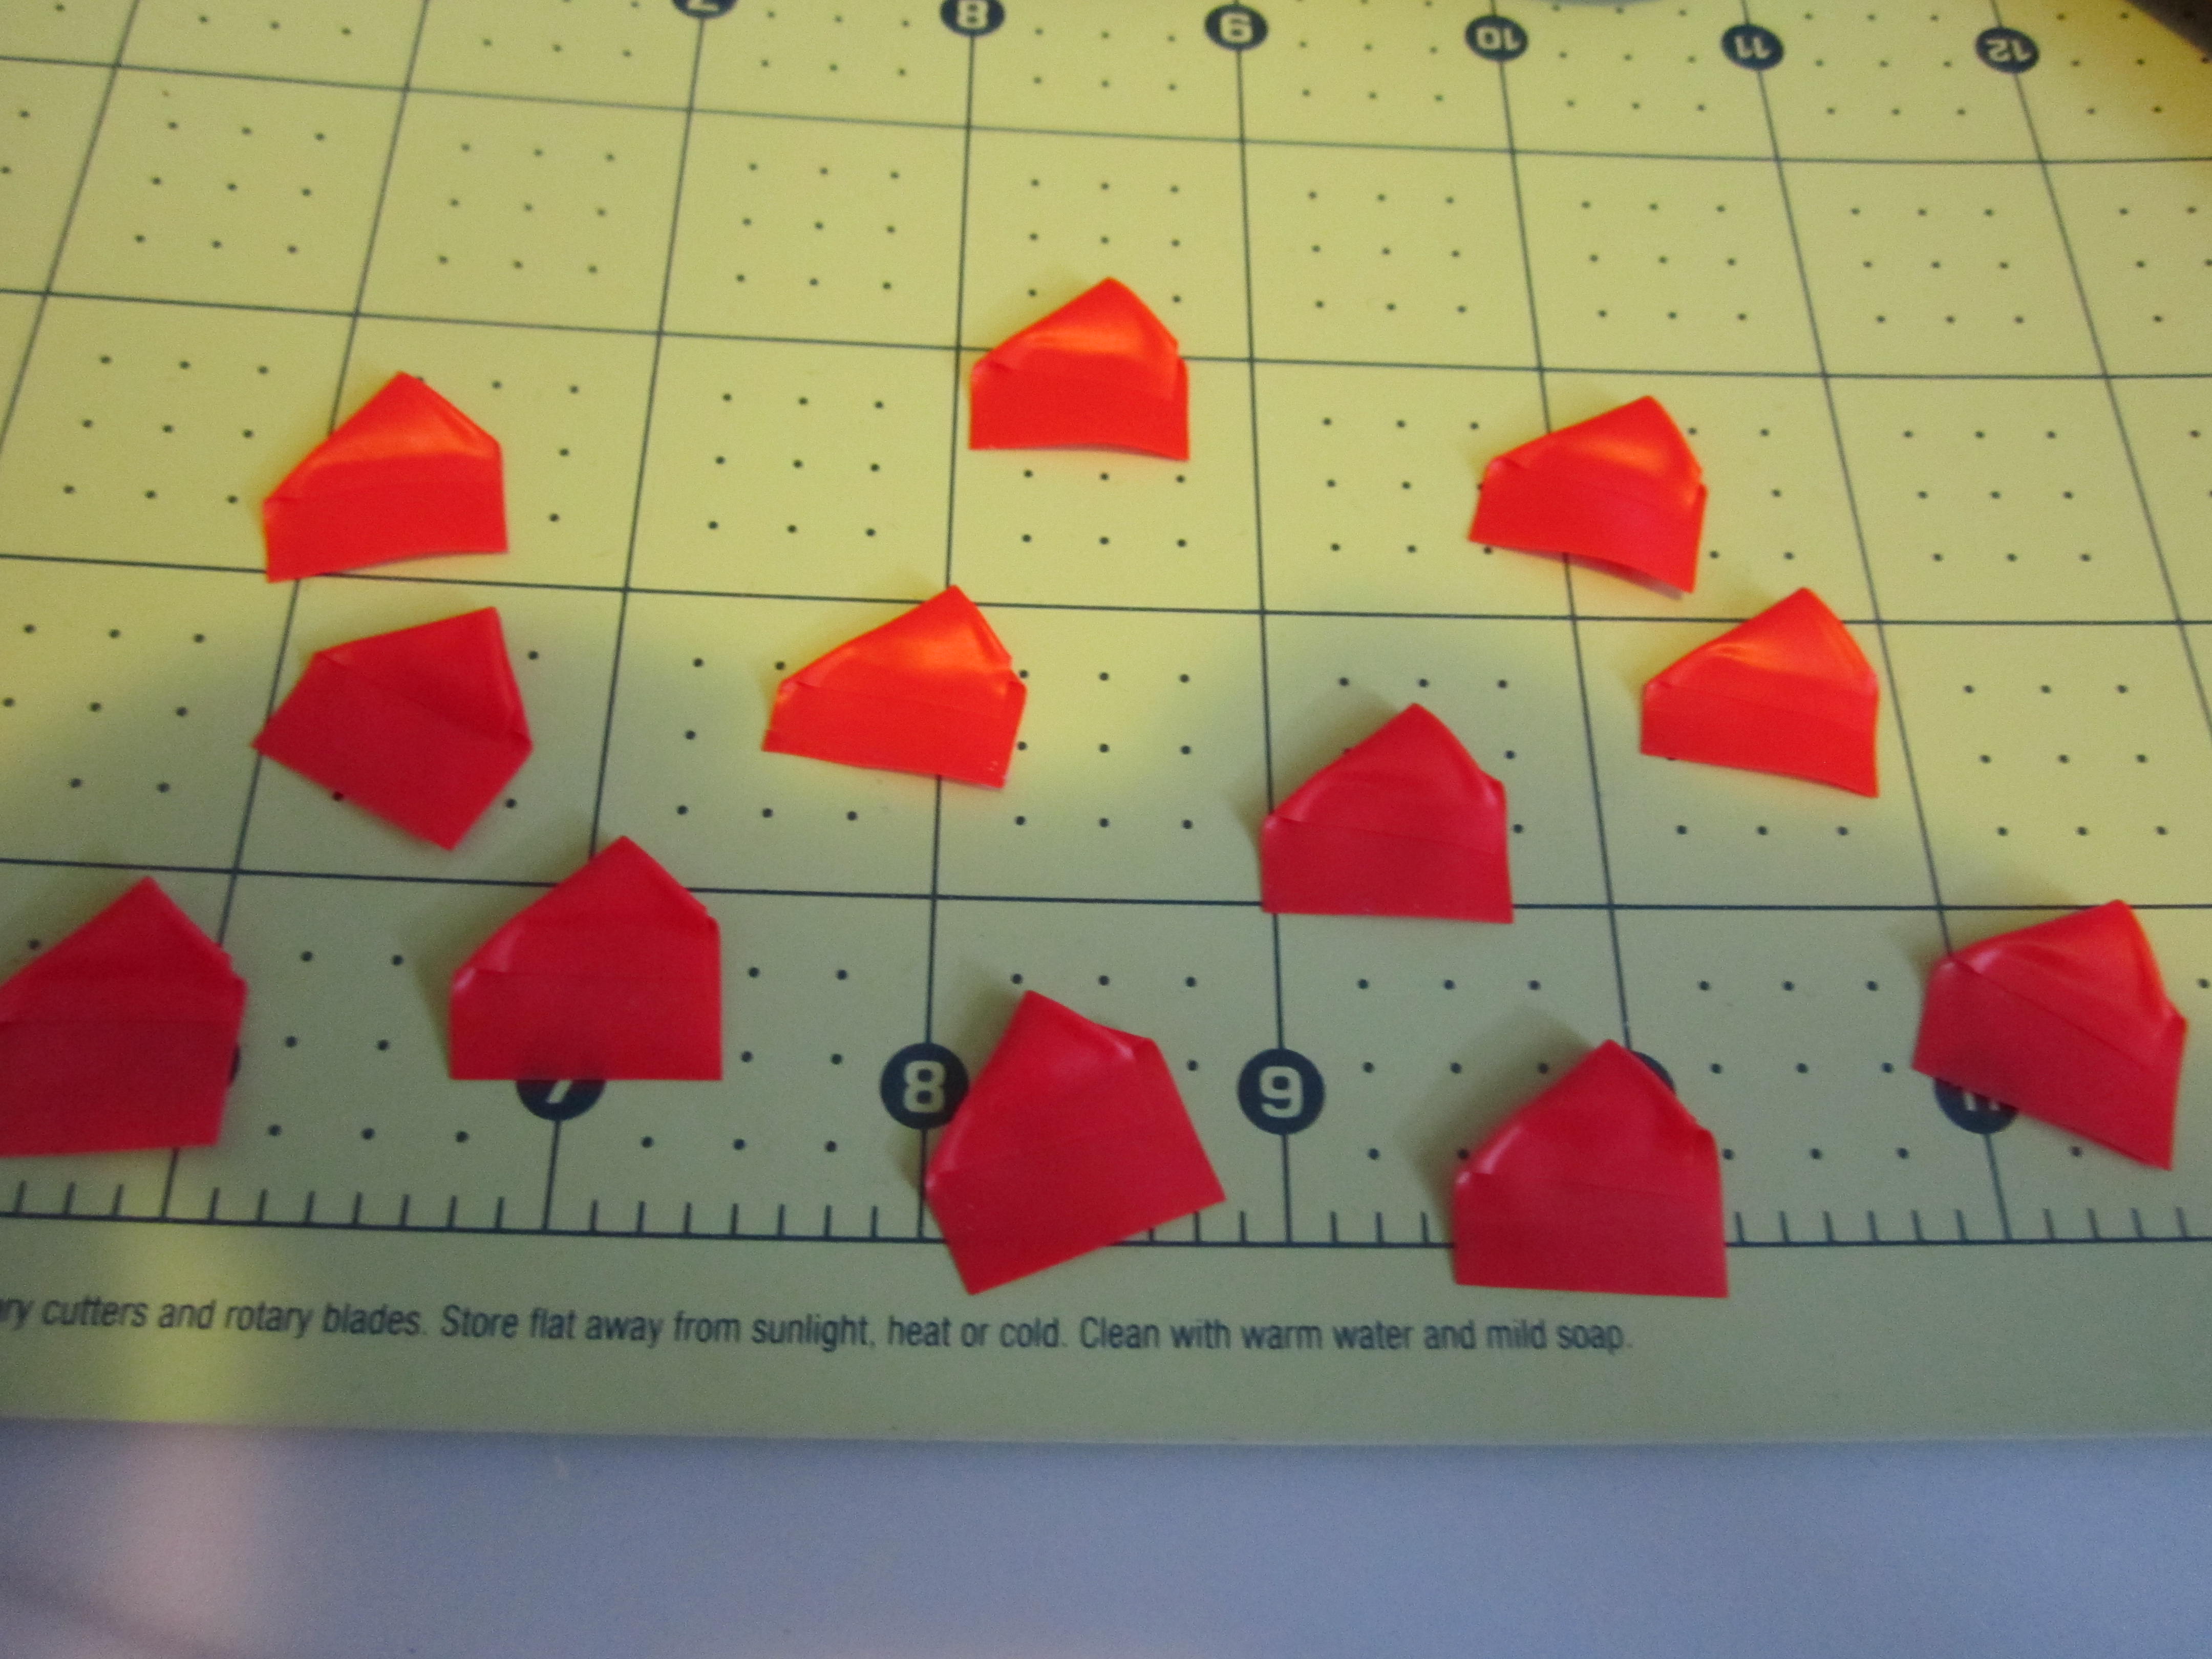
Lay out a strip of your tape on your mat and cut it into 1 inch segments. You could do smaller but its easier with lines.

Pick up one rectangle and fold a corner over.

Then the other. You’ll have a house shaped thing with sticky on the bottom.

Do it again and again and again and again. They don’t have to be perfectly exact.
Tape the end of your pipe cleaner. I used green just because its conventional.

Roll a house shape around it.

Put another with the point opposite on the pipe cleaner. Then 2 more on the other sides.

Keep going with the sorta staggering the points but keep them even.

Finished.

I rolled some tape down the pipe cleaner but you don’t have to, especially if you suck at doing it like me.

I made another for fun.

The end.

Give it a try. Its super fun.
Duct Tape Flower Pencil Topper
Its back to school time with fresh new school supplies! The best time of the year and I don’t even have kids! I am a day care teacher though and I’m back with the whole duct tape thing.
There are tons of sites with instructions on how to make duct tape flowers out there and they are good. (I learned from a YouTube video) I made a couple and took them to work, No one can really walk away with a pen with a giant red flower on the top. However, making them with the kids in school aged day care is kinda hard since all the pens disappear! I came up with a way to make them removable so you can put them on different pens or pencils.
Supplies are:
- duct tape and electrical tape
- knife
- self-healing mat
- pen or pencil

This is me we are talking about so forgot to put out the scissors I used to cut the initial piece of electrical tape.
Wrap a piece of electrical tape around the end of your pen, sticky side out. Put another piece of tape over the top to make a sleeve on the end of your pen

Set that aside and start your petals. There are tons of different directions on how to do this out there but I’m making my own here since I’m Good Enough.
put a duct strip of tape down on your self-healing mat.
Cut it at 2 inch sections. It doesn’t have to be perfect!
Fold one corner over

Then fold the other corner over leaving a strip along the bottom
Once again, it doesn’t have to be perfect! I like to make up a whole bunch before starting on the flower.

Take one of your petals and wrap it around your sleeve on the pen.


Place the next petal across from the first.

And the next pair opposite the first.

Continue putting the petals on slightly offset from the previous ones.

Look! You can take it off!

This flower has 16 petals on it.

I think it’s a good size. Could maybe use another 8 but you really don’t want to get too heavy. I did make another one with 32 petals.

Mishmash using 8 different tapes.

The camo is a dollar store tape, It doesn’t have the stickiness of Duck brand but it works.
Anyway, it really is easy and fun and Good Enough! Try it!
Duct Tape Nintendo DS Edition
Summer is here and to add to my duct tape wallet for other stuff collection we are making holders for Nintendo DS and 3DS.
It is the same pattern as my Billion Dollar wallet only upsized. I found that 5 strips works best (after some Good Enough trial and error of course.


This one I used Duck Brand packing tape. Pink zebra is super cool! Inside and outside is the paking tape and it feels like plastic. The yellow electrical tape really pops. I didn’t think it would but the 9 year old did.

While making a small regular wallet it was super way long so I thought to make a double pouch for game storage.
Just when you are at the pouch sizing stage, fold it in a W shape.

Then tape up the sides as usual. It makes 2 pockets.

Just right for holding 4 or so games.

You will note the lac of closures here. On my lunch I have to hit the dollar store for velcro.
Hi there!
If you have arrived from Twinstuff.com, welcome! I’m Kendra.
I’ve been a Twinstuff member since 1999 and love it. I haven’t done a craft for here in a while but I promise I will soon!

Melted Pony Bead flowers
It’s all over Pinterest and recently we’ve been doing beads at day care so I decided to try the whole melting pony beads thing.
The blogs I have read have said that it is stinky so I decided to do it outside. My house doesn’t have an outlet on the patio (don’t know why) so I set up on the side of the house with my toaster oven.

(haven’t used it in a while but crafting!!!!!)
You also need pony beads.

I used aluminum foil on the baking sheet. Lay out your beads in the shape you would like. I did flowers because flowers are easy.

And pop into the oven. I had it set at 450 degrees.
The first batch I watched for a reaction. It melted quite slowly.

It took about 10-12 minutes (I’m Good Enough so didn’t think to time it) You could probably fudge a bit with more time but keep an eye on them.
Take them CAREFULLY out of the oven and let cool. They cool pretty quickly but always be careful of course.
Here is a before and after.

I did a second batch to make pairs of flowers.

And the results all together.

They don’t come out exactly perfect but it was neat to try. Don’t know what I’m going to do with them but it was something I wanted to try so I did it.
